Contributor's Guide
So, you are about to contribute to the Morevna Project? That's great! The question is where to begin. Working in collaboration on such a complex project implies the need to use various open-source tools. Git, wiki, make... All of this stuff could confuse even those who are more or less familiar with the open source development model. Also, to manage the project data effectively we should define and follow certain policies. This manual was written with the purpose to guide you into the depths of the Morevna Project's infrastructure and help you to understand the main principles of the contributor workflow.
Before you begin
First of all, before you contribute, consider the free-culture nature of the project. We are only able to accept contributions conforming to two main conditions:
- By contributing to the Morevna Project your contribution is considered to be released under the Creative Commons Attribution 3.0 License (see http://creativecommons.org/licenses/by/3.0/).
- Contributed data must be produced using the open-source software only.
Here's the software that should be used for particular tasks:
- Drawing, static images: MyPaint, GIMP, Krita.
- 2D animation (vectorization & tweening): Synfig Studio.
- 2D frame-by-frame animation: Pencil.
- 3D modeling, animation and video editing: Blender.
Is it ok for you? If yes, then let's go!
Concept documentation
Start by getting familiar with the concept documentation. Let me invite you to the Morevna Project wiki.
There is always a lot of pending tasks at the main page, so you could see what is planned to be done in the nearest future and who is responsible for it. You could track the progress made on particular tasks by other contributors by watching the Recent Changes page.
To be able to edit wiki pages you need to register. When you are editing the wiki please don't forget to write a summary of your changes so other people can easily understand what you have done without watching the whole page. Wiki syntax is intuitive and easy to learn just by watching the markup of existing pages. For detailed information on using the wiki software visit User's Guide.
The most common question is how to upload an image. To insert an image into a post, just write this tag in the message body:
[[Image:Filename.jpg]]
where Filename.jpg is the name which will be assigned to your image after it is uploaded. After you save the page, at the place you inserted the tag you will see a link like this:
File:Filename.jpg
Clicking this link will guide you to the file upload form. After upload your image will appear on the page instead of the tag. If you made a new version of the existing file it's better to upload it under the same name - the wiki stores the file changing history and previous versions could be easily reverted if a mistake happens.
Production tree
If you want to go deeper and work directly on the project footage, you should get a copy of the production tree.
- NOTE: All further information is applied to Linux operation systems only.
Structure
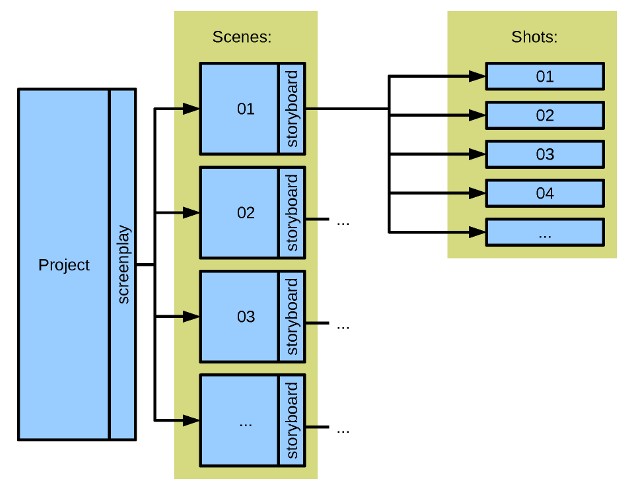
The source files are organized in the production tree according to the following structure. There is a screenplay, the main thing. Screenplay is split into parts which we call "scenes". Each scene is a significant (and relatively independent) part of the story, with a particular sequence of particular actions happening in a particular place (or places). Each scene in our screenplay is referred to by a number, which is assigned according the order of the scenes.
The animation sources of every scene are stored in a separate directory with the corresponding number. Each scene is planned with a storyboard. Storyboard divides scene into shots. Take a look at the storyboard of the demo and you will see that each shot has an individual number, like the scenes. Source files for each shot are placed in the subdirectory with a corresponding number inside of the scene directory.
There is a scene that currently has a special status - it is scene 04. It is special because it is almost the exact equivalent of the Morevna Project Demo, which we are currently working on. So, the Morevna Project Demo should be considered as scene, too.
Fetching
Project directory tree is managed with git. Git is an open source version control system which allows you to track, manage, collect and combine together changes made by contributors working on a large project.
The project directory tree is stored in the git repositories. There is a repository, containing shared data - files which are common for various scenes of the project, such as 3D models, layouts, colorcharts, etc.. It is called "lib". Other repositories contain project scenes.
We presume that a person generally won't need to work on all scenes at once. So, you do not need to fetch all project files (which is really bandwidth expensive). Instead, just fetch the "lib" repository and only the scenes you need. Such approach dramatically reduces bandwidth usage and has other advantages, like separating the editing history of one scene from another. That's the reason why this scheme was chosen.
Currently there are no scenes in the project other than the one corresponding to the Morevna Project Demo. So, there's nothing to choose - let's fetch it.
Repositories are currently in private mode, so you should request an access to it first to be able to work with production files. To request the access just contact the team by email. After you receive your username and password, proceed to the next step.
 NOTE: As of 2012-02-19 the repositories are switched into the public mode.
 So you don't need username/password to access the project files.
 Just follow the instructions here - http://morevnaproject.org/sources/
To fetch the repository you need to install git. Most modern Linux distributions have it in their repositories. We recommend to install the `git-gui' and `gitk' packages along with git itself.
After you have git installed, open terminal and create directory for repositories:
$ mkdir morevna
$ cd morevna
Now clone:
$ git clone ssh://USER@git.tuxfamily.org/gitroot/morevna/lib.git
Replace 'USER' with the username that you received. Enter your password when it is requested. The system may ask you about adding an ssh key, answer 'yes'.
Also, we will need Remake to render project sources:
$ git clone http://github.com/morevnaproject/remake.git
Now we are ready to fetch scenes. To fetch 'demo' use the following command:
$ git clone ssh://USER@git.tuxfamily.org/gitroot/morevna/demo.git
Again, don't forget to replace 'USER' with your username.
- Warning: The demo repository size is more than 100 Mb.
Now you have a full copy of the production tree on your computer.
- Note: By default 'git clone' produces a full-fledged repository with it's complete history. Because of the nature of the Morevna Project we have a lot of binary files in repositories (images, Blender scenes) that may result in a huge repository history. To reduce the transfer size you could do a shallow checkout which will cut the history by the specified depth, for example:
$ git clone --depth 2 ssh://user@git.tuxfamily.org/gitroot/morevna/demo.git
Setting up build environment
The production tree contains only the source files of the footage. There is no reason to keep rendered footage in the repository because it could easily be produced from source files at any time. To do that you need to have the required software installed. Check the REQUIREMENTS file in the 'lib' directory.
You will see something like this inside:
(*) synfig >= 0.62.01     (http://synfig.org/)
(*) blender = 2.49b       (http://www.blender.org/)
(*) vorbis-tools          (http://www.xiph.org/)
(*) remake >= 0.1         (http://github.com/morevnaproject/remake)
(-) Pencil = 0.4.4b       (http://www.pencil-animation.org/)
(-) GIMP >= 2.4           (http://www.gimp.org/)
That means that you need a version of Synfig no less than 0.62.01, version of Blender equal to 2.49b, any version of vorbis-tools and remake no less than 0.1 (which you have fetched just now). Mark (-) near Pencil and GIMP means what they aren't required to render footage, but you will need them if you decide to edit files produced with that software.
Synfig Studio is the main tool for producing the 2D animation in the Morevna Project. It is a relatively young piece of software and not every Linux distribution has it packaged in the repositories by default. New releases come out every half year, although the latest development versions usually have some new features and bug fixes compared to the release. Most of those features and bugs are critical to the Morevna Project, that's why most of the time we are sticking to the development and not to the releases.
Blender is the free open source 3D content creation suite. It is also have simple, but very powerfull Video Sequence Editor used by Morevna Project for editing footage. Make sure that your version of Blender is compiled with FFMpeg support.
Pencil is required if you intend to work with the draft animation sketches (*.pencil files).
Most easy way to install appropriate versions of Synfig Studio, Blender and Pencil is to get packages from this page.
The other software mentioned can usually be found in the repositories of any modern Linux distribution. Please refer to your distribution documentation for details about installing software.
Demo background music
Background music for demo is not included in the repository. It is a composition by Per Gessle - "Hey Mr Dj (Won't You Play Another Love Song)" - and we do not have rights to use it yet. If you have that composition and want to enjoy the demo with background music, you should place a file with the name "Per Gessle - Hey Mr Dj.ogg" into the demo/music directory.
Building project
OK, now it's time to render all of the files in the project.
To do that, you should go to every shot subdirectory inside of the 'demo' subdirectory, open every .blend and .sif file there, select the "File" -> "Render", choose the right location, and click "Render", then wait until the shot is rendered. Then go to next directory, open every .blend and .sif file there, select the "File" -> "Render"... OK, I'm just joking. ^_____^
It's not accidental that we have 'remake' in the requirements. All source files in the project are rendered automatically in necessary order with a single command if you have all the software installed correctly. It's all done thanks to 'remake' utility.
And that's not all. Imagine you changed the model of the bike in some way. The bike model is used in scene 48, 52, 53, 55 and... and... Well, of course you don't remember exactly which scenes use the bike model, so you don't remember which of them should be re-rendered. And you don't need to! Just run 'remake' again - it will automatically detect changes in the project, resolve dependencies and execute the appropriate actions to update your footage. Only scenes affected by changes will be rendered.
OK, let's start. Make sure that you have enough free disk space. Currently footage requires approximately 600MB. All rendered files will go to the 'render' directory.
We assume what you still have your terminal open and you are still in the 'morevna' directory. To render footage of the demo just type:
$ ./remake/remake demo/demo.blend
Footage rendering could take a lot time. So it's a good opportunity to take a break and go for a walk. ^_^
After rendering will be finished you will get 'demo.blend.mpg' file inside of the 'demo/render' directory. This is the footage rendered as video sequence into final file so you could watch project at it's current status.
Working on the project
Ok, now you have software and footage and you ready to edit project data.
As you have noticed, the source files of Morevna Project are managed with 'remake'. To learn how to work with the project sources under the control of 'remake' start with this tutorial.
Next, we outline some moments specific to the Morevna Project production. You already know what 'demo' directory contains a demo scene. It is a separate "remake project".
There is also 'lib' directory, which contains all project data which is common to the different scenes. I.e. 3D models (bike.blend, helicopter.blend), color charts (colorchart-ivan.sif, colorchart-morevna.sif) and other stuff. It is a separate "remake project" too. If you working on the 3D models, please place textures which are specific to a file of model inside the dir with the same name as the file (i.e. textures for 'lib/bike.blend' will go into the 'lib/bike/' directory).
Each "remake project" have 'render' subdirectory, containing rendered footage and final animation.
Inside of the demo directory you will find a subdirs with a numbers. They are corresponding to shots in the storyboard. I.e. 'demo/01' contains sources for shot 01, 'demo/02' contains sources for shot 02 and so on. The storyboard itself is located at the 'demo/storyboard' subdirectory.
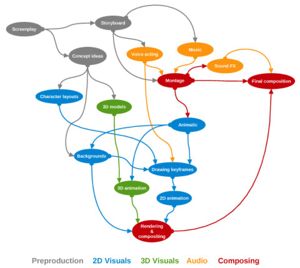
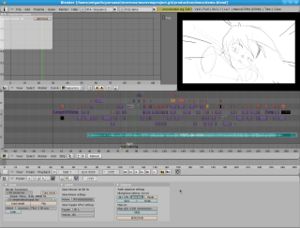
Inside of the 'demo' directory you will find an important file - 'demo.blend'. It contains a video sequence, where all footage composed together into a single movie. Because you have a footage already rendered, you could open it right now. As you see from production pipeline image, we created video sequence right after the storyboard was produced. Basically it contained only static images from a storyboard. We used it to sync shots with sound, define length and timing of each shot.
When we making a progress on particular shots we replacing them in the video sequence with their current version. Thus our "slideshow" slowly becomes animated. Usually, at first, draft animation made - it is called 'animatic'. Animatic helps to define timing of the actions in the shot, show the idea of the action happening. It doesn't expose how the characters and objects look - it is concentrated on movement. Animatic could be done in Synfig, Pencil or Blender, depending on the situation. Sometimes we use them together when we want to combine 2D and 3D animation.
After animatic for shot is done, keyframe animators draw keyframes of the shot - characters and objects exposed at extreme positions during their motion. Animation constructed from keyframes only is not smooth and, like animatic, gives just the idea of the motion. The difference is that the objects/characters on keyframes are drawn good and detailed - like they look in final movie. Keyframes are generally drawn in Gimp, MyPaint or Krita. At the same time artists work on the backgrounds. Sometimes we are making a 3D layouts for some locations, to clearly understand the interaction of the characters with environment and camera position at particular shots. Discussions about the work on particular shots and backgrounds are usually happen on the wiki.
When clean keyframes are produced they are traced in Synfig. Synfig takes care about filling the gaps between keyframes - tweening. Animation becomes smooth. And another thing - image becomes resolution independent, so, whatever was keyframe resolution, it is possible to make final rendering in HD.
- Notice, what currently footage is rendered at 480x270. Because of that rendering process not consumes too much time. The final movie supposed to be rendered in 16:9 HD - 1920x1080.
After the animation in Synfig done, it is composited with 3D (if needed), rendered and placed into video sequence ('demo.blend' file). Compositing could be done not only at the end - we often do compositing at the early stages for animatic and keyframes, inserting result into 'demo.blend' file to see how it looks in the whole piece. At current project status you will see a lot of shots at different stages in the 'demo.blend' file.
That's how our workflow looks in general. As you see, video sequence is a central point where you starting from and when you finish working with project files.
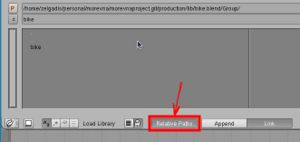
Working with the project, please remember to always use relative paths, when you linking data from one file to another. Synfig usually do it automatically and even if something goes wrong, its files could easily be edited even with simple text editor and nothing lost. But with Blender situation is radically different. If it is not finding some data which was linked through usage of absolute paths - it is loosing it. So please don't forget about little "Relative paths" button in Blender, when you use File-> Append or Link or something like that.
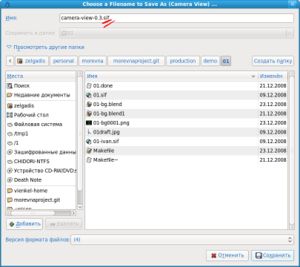
Also notice, what all Synfig data in repository is stored in the .sif files. By default Synfig saves new files in compressed .sifz format, what is no good for keeping in git, because changes are not tracked effectively. So please don't forget change format to 'sif', when you saving new files.
Remember, if you made some change into existing project files you could render them into footage by executing './remake/remake' and giving the path to the file as argument. After footage will be re-rendered you could watch changes in the demo/render/demo.blend.mpg video file or in the video sequence.
Sharing changes using git
After you made some changes to the project you possibly want to share them with other project participants. You could do that by pushing your changes back into the project repository.
Real power of git comes when you operating with it through command-line. Though, not all of us are comfortable with console, that's why I suggest to use 'git-gui' for commiting changes and updating development tree.
For those, who brave enough to go with command-line I recommend to read a very nice tutorials to grab the basics of git: Pushing and pulling with git - part 1 & part 2.
My following explanation will be about the use of 'git-gui' for commiting data.
I recommend to create a shortcut for 'git-gui' executable on your desktop. If you start it from terminal then it will request all passwords through terminal window, which could be quite confusing sometimes. You may also run git-gui through system Run dialog (which is invoked through Alt+F2 shortcut in Gnome).
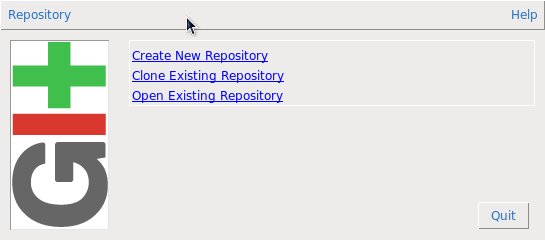
When git-gui starts it will offer you following dialog:
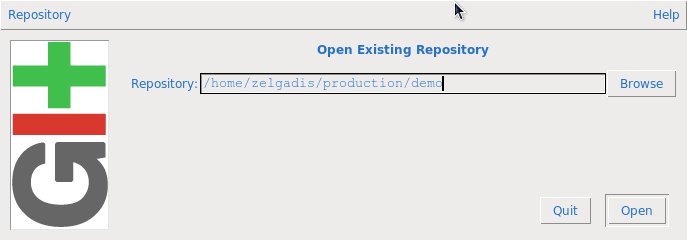
Choose 'Open Existing Repository'. In next dialog click "Browse", go to the '~/morevna/demo' directory and click OK. Then click 'Open'.
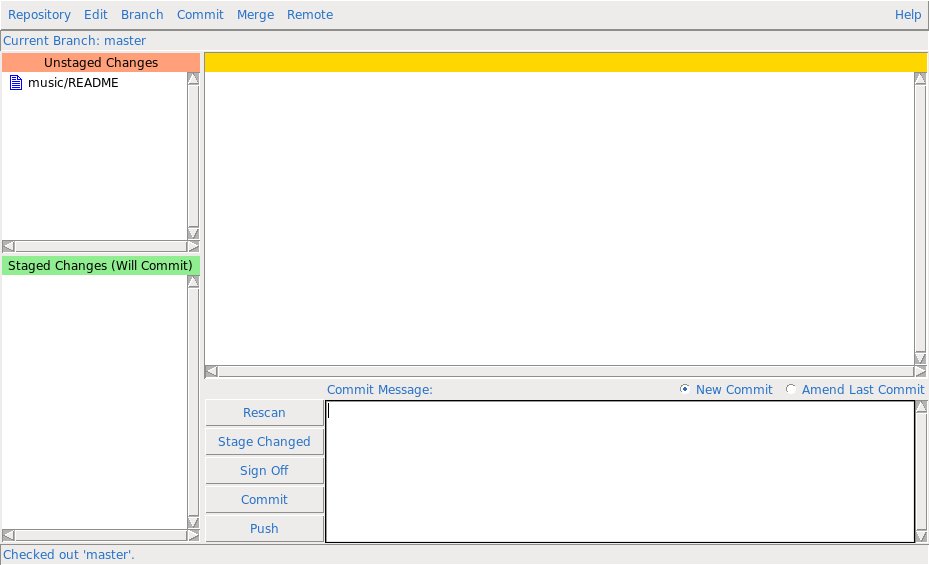
Main GitGui window will be shown.
Introduce yourself to git
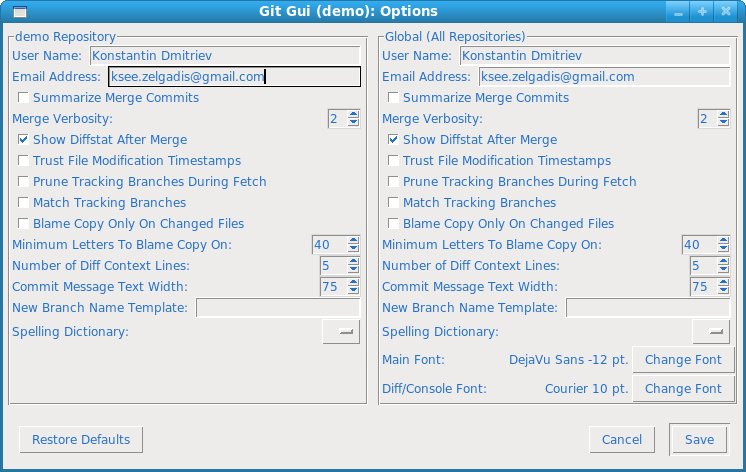
Each change recorded into repository (commit) will be signed with your name and e-mail. You need to introduce yourself to git. Choose "Edit" -> "Options" and fill name and e-mail fields.
Creating your personal branch
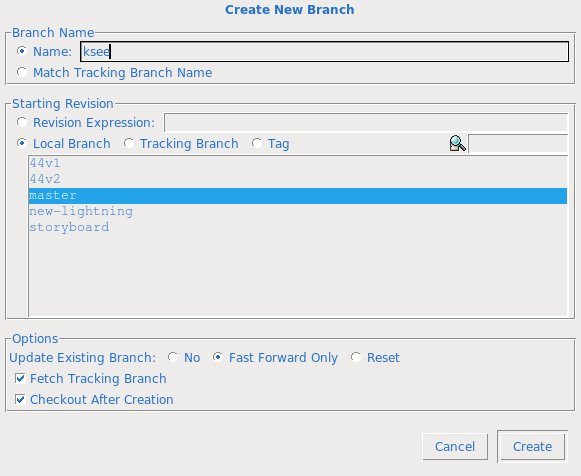
Before commiting your changes it's better to create your personal branch, so your changes won't interfere with changes of other contributors. To do that select "Branch" -> "Create" from menu. Type some sane name into "Name" field (your nickname, for example) and press "Create" button.
Your branch will be created and it will be set to current. Before that your current branch was "master", which is the main project branch.
Browsing repository
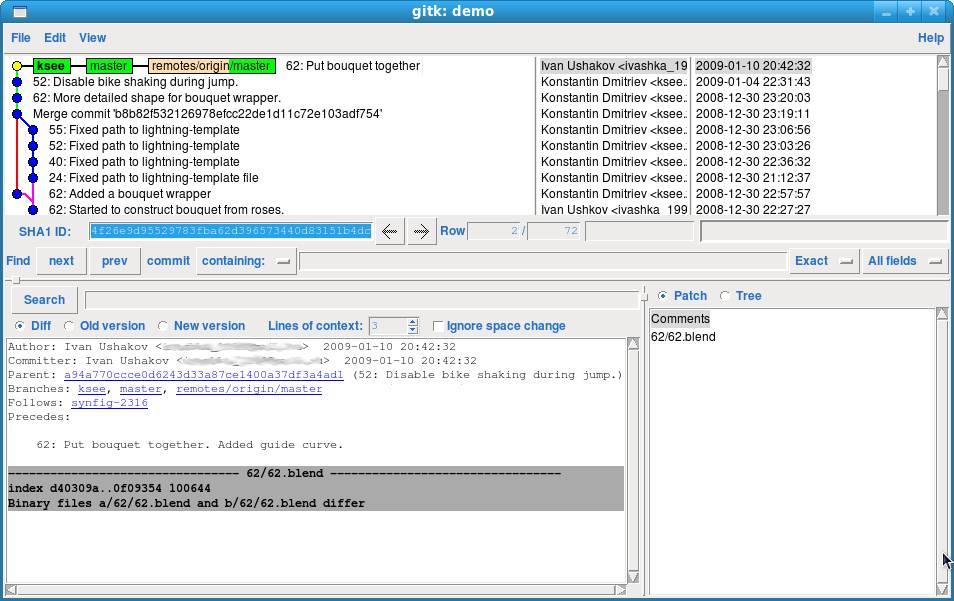
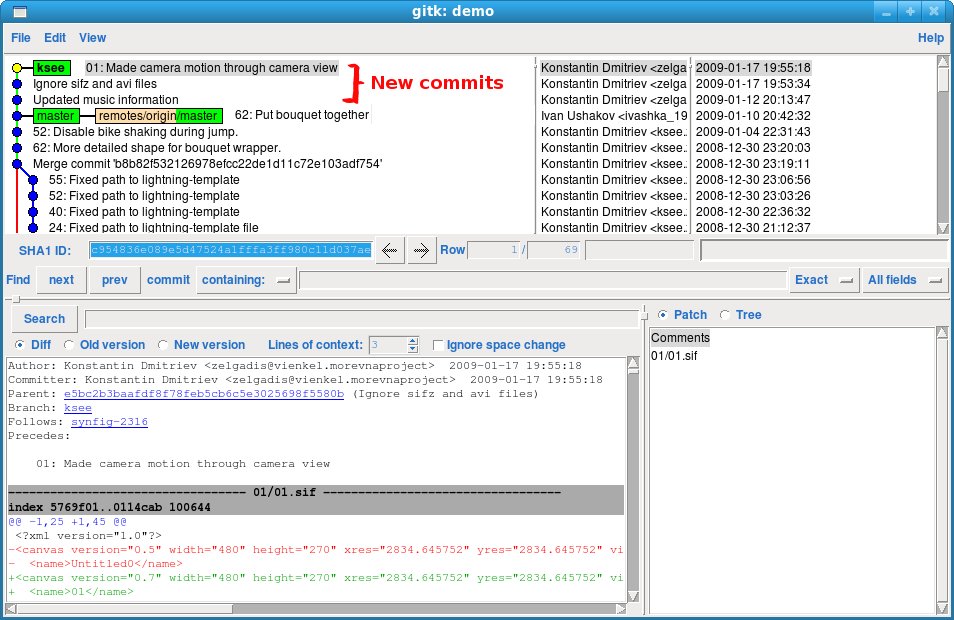
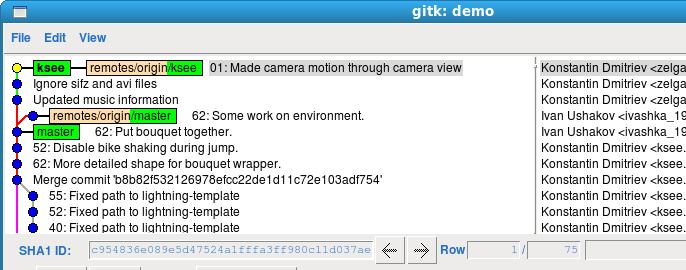
You could watch project history by selecting "Repository" -> "Visualize All Branch History". This command will open 'gitk' window.
Green labels is a branches heads. Your current branch is marked with bold text.
There is also a yellow labels - tags. It is a special names for the particular commits. For example, you could see jumps from one version of used software to another. That allows to track regressions if they are appearing.
Now let's see how to add your commit. Close 'gitk' and return to main GitGui window.
Commiting your changes
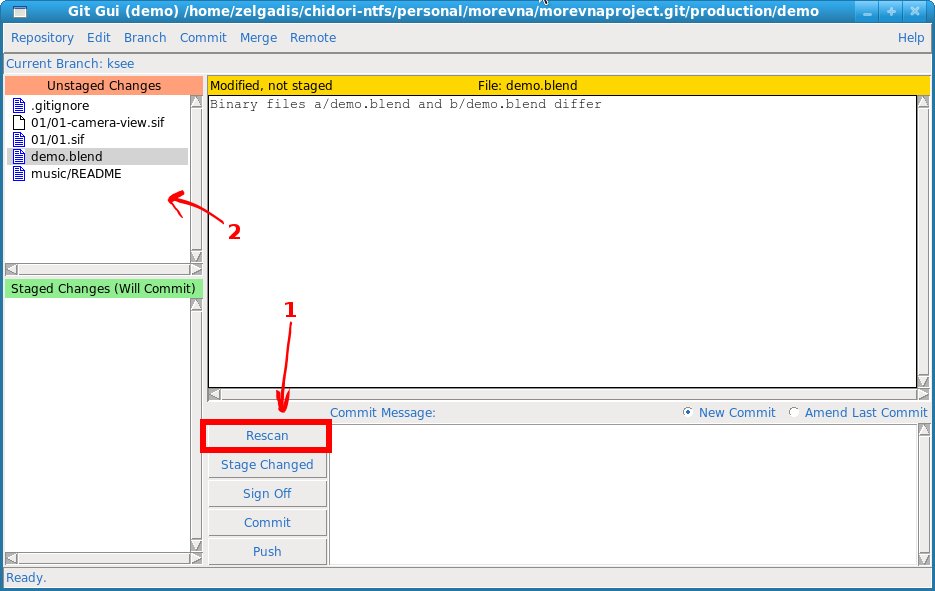
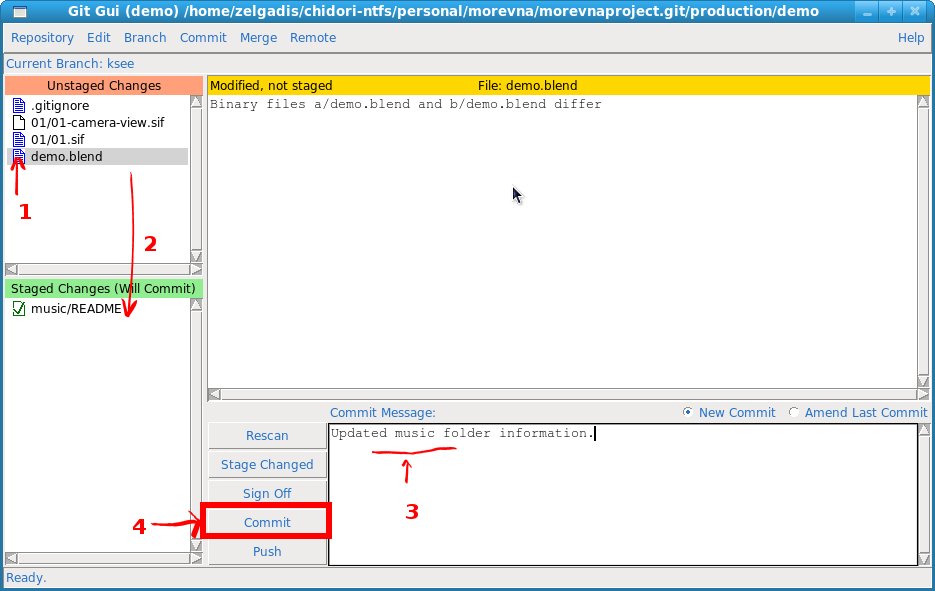
Imagine, you mage some changes in the demo repository. Press "Rescan" button in the main GitGui window. Changed files will be shown in the red area with a label "Unstaged changes".
- Note: If you made changes outside of the 'demo' submodule - in the 'production' directory, those changes will not be reflected here, 'cause 'production' is an independent repository. To commit changes made there you should open 'production' directory in git-gui and do all requested actions there.
- Important: Backup and temporary files are excluded from tracking. We also have *.sifz files in ignore list to prevent user from commiting them by mistake instead of sif files. Check the contents of '.gitignore' file to see a list of ignored files.
Select files you want to commit by clicking on the icons near their names. They will be moved to the green area with a "Staged Changes" label.
Now enter Commit message at the right textbox and press "Commit". Your changes will be added to your local repository.
- Note: Please describe your changes in a sane way so it will be clear for other contributors what have you done.
Open "Repository" -> "Visualize All Branch History" again and look at your first commit there. You could do more commits - as many as you like.
You may commit to your repository even if you are not connected to Internet. If you did something wrong on your files you could always revert to one of the previous states. This is a great advantage of git - no Internet connection required when you manipulate your commits - that allows you to arrange them as you like and most effecient.
- Note: Please do not commit to the repository junk or copyrighted data without permission. Also, watch the size of your files - if they are too huge, then consult with the project team before committing them. In most cases there is a way to avoid keeping too big files in repository.
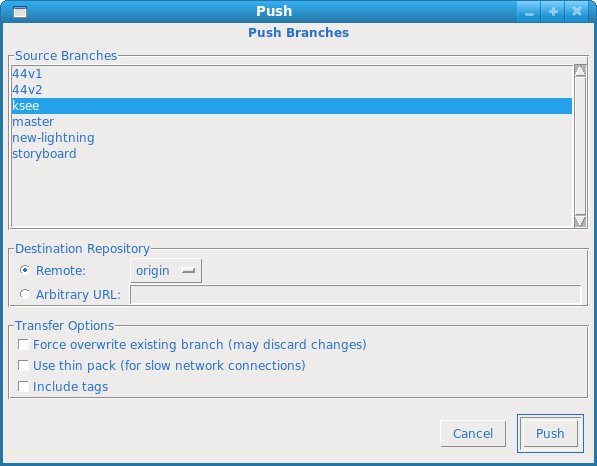
When you feel ready to share your work, push commits back into the public repository. To do that, click "Push" button in the main GitGui window.
In appeared dialog ensure what your branch is highlighted and click "Push". GitGui will ask your password and push your changes to the server.
- Note: If you have run 'git-gui' through terminal then password will be prompted in terminal window. Check it if no password prompt dialog appears. That often confusesg me, that's why I not recommend to run 'git-gui' through terminal ^_^.
Updating your branch
Each contributor is working on his separate branch. Project administrators merging their changes into master branch. When you want update your branch with latest changes made in project you should merge your branch with master branch.
To do that you should pull latest changes from repository. Choose "Remote" -> "Fetch from" -> "origin" from menu in main GitGui window. Your password will be requested.
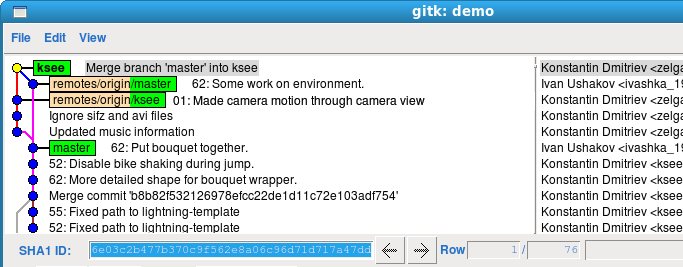
After pull process will be completed check what was changed in the main repository by selecting "Repository" -> "Visualize All Branch History" from menu.
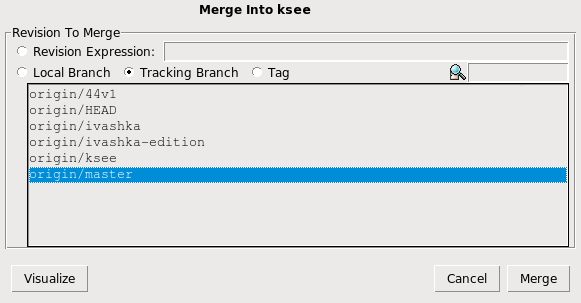
You see, during our work on personal branch, some changes were applied to master branch. We want to incorporate those changes in our branch. Select "Merge" -> "Local Merge".
Select "Tracking Branch", choose 'origin/master' branch from the list and click "Merge". The branches will be merged. Sometimes merge produce conflicts, but usually it is easy to resolve them. Open "Repository" -> "Visualize All Branch History" again to see changes.
Don't forget to re-run 'remake' to update footage and get changes reflected in the video sequence.
You could track changes in master branch through cia.vc page: http://cia.vc/stats/project/MorevnaProject. Or if you want to be notified about every project event (including wiki and blog), check out our Underground feed.
Good luck!
